
Overview
This is my current macOS setup, documented mostly for future me whenever I get a new machine, and partly so that I have something to point friends to when they ask. It’s opinionated and personal, skews toward what I actually use daily, and skips anything I found myself not reaching for.
Package Managers & Languages
-
Homebrew, the unofficial package manager for macOS
- With it, we can install:
- CLI tools (
git,nvm,wget) withbrew install, - and GUI apps (Docker, VSCode) with
brew install --cask,
- CLI tools (
- and keep everything up-to-date with a single command:
brew upgrade. - The Homebrew installer will also prompt you to install Xcode Command Line Tools, providing many essential utilities for software development on macOS that does not come pre-installed.
Note (Installation steps)
Install by copying and pasting the following command in your terminal:
Terminal window /bin/bash -c "$(curl -fsSL https://raw.githubusercontent.com/Homebrew/install/HEAD/install.sh)"Then, run the following to ensure you have the latest version and packages:
Terminal window brew updatebrew upgrade - With it, we can install:
-
Note (Installation steps)
Seems better to skip the direct installer to instead use
nvm(Node Version Manager) so you can switch Node versions per project:Terminal window brew install nvmThen, create the directory for
nvm:Terminal window mkdir ~/.nvmEdit your
~/.zshrcfile with:Terminal window nano ~/.zshrcAnd add the following lines to the end of the file:
Terminal window # For NVMexport NVM_DIR=/opt/homebrew/opt/nvm[ -s "$NVM_DIR/nvm.sh" ] && source "$NVM_DIR/nvm.sh" # This loads nvm[ -s "$NVM_DIR/bash_completion" ] && source "$NVM_DIR/bash_completion" # This loads nvm bash_completionFinally, restart your terminal or run:
Terminal window source ~/.zshrcAnd verify your installation with:
Terminal window nvm --versionInstall specific versions with:
Terminal window nvm install 24nvm use 24 -
Note (Installation steps)
Install via Homebrew:
Terminal window brew install pythonVerify the installation with:
Terminal window python3 --versionpip3 --versionThen, for any new Python project, create and activate a virtual environment so dependencies stay isolated per project:
Terminal window python3 -m venv .venvsource .venv/bin/activateOnce activated,
pythonandpip(without the3suffix) will point to the virtual environment’s versions. Install packages as usual:Terminal window pip install fastapi uvicornAnd when you’re done, deactivate with:
Terminal window deactivate
Software Development Tools
-
Git CLI for version control
Note (Installation steps)
Install via Homebrew:
Terminal window brew install gitThen, run the basic setup with:
Terminal window git config --global user.name "Your Name"git config --global user.email "your@email.com"git config --global init.defaultBranch mainTip (Set up SSH for GitHub)
Authenticating with GitHub over HTTPS means rotating a Personal Access Token every time it expires, even with credential caching enabled. On the other hand, SSH is set-once-and-forget. We only need to generate a key, add it to GitHub, and we’re done.
Generate a new SSH key:
Terminal window ssh-keygen -t ed25519 -C "your@email.com"Accept the default file location and set a passphrase if you’d like. Then, copy your public key to the clipboard:
Terminal window pbcopy < ~/.ssh/id_ed25519.pubFinally, add the key to your GitHub account at github.com/settings/ssh/new, then test the connection:
Terminal window ssh -T git@github.comYou should see a message like
Hi <username>! You've successfully authenticated.... -
Docker for containerised development
Note (Installation steps)
Download Docker Desktop from the site, or via Homebrew:
Terminal window brew install --cask docker -
Visual Studio Code is still my go-to code editor
Note (Installation steps)
Download VSCode from the site, or via Homebrew:
Terminal window brew install --cask visual-studio-codeTip (Recommended configurations)
Open the command palette (
Cmd + Shift + P), runShell Command: Install 'code' command in PATH, and you’ll be able to open folders from the terminal with:Terminal window code .Tip (Recommended extensions)
- Material Icon Theme – nicer file/folder icons in the explorer
- Prettier – Code Formatter – opinionated formatter for most web languages, with format-on-save support
- TODO Highlight – highlights
TODOandFIXMEcomments so they don’t get lost
-
pgAdmin4 as a GUI for PostgreSQL databases
- Great for quickly inspecting tables, running ad-hoc queries, and managing database users without having to drop into
psqlevery time.
Note (Installation steps)
Download pgAdmin4 from the site, or via Homebrew:
Terminal window brew install --cask pgadmin4 - Great for quickly inspecting tables, running ad-hoc queries, and managing database users without having to drop into
-
Postman for building, testing, and documenting APIs
- Great for whenever I’m developing on backends.
- Allows me to organise endpoints into collections, save example requests, and test auth flows.
Note (Installation steps)
Download Postman from the site, or via Homebrew:
Terminal window brew install --cask postman
Terminal
-
iTerm2, a powerful alternative to Terminal for macOS
- Colours, readability, autocompletion and split terminal displays, iTerm2 brings many great modern quality-of-life tweaks to the terminal on macOS.
Tip (Recommended configurations)
-
Set as default terminal
- In the top menu bar, click on
iTerm2>Make iTerm2 Default Term.
- In the top menu bar, click on
-
Disable inactive split pane dimming
-
The default dims whichever pane isn’t focused, which gets quite distracting.
-
In the top menu bar, click on
iTerm2>Settings>Appearance>Dimming, and untick theDim inactive split panescheckbox.
-
Shell
-
- Zsh is already the default shell on macOS, but Oh My Zsh enhances it through plugins and themes.
- My theme of choice is Powerlevel10k.
Note (Installation steps)
Install Oh My Zsh with the following command:
Terminal window sh -c "$(curl -fsSL https://raw.githubusercontent.com/ohmyzsh/ohmyzsh/master/tools/install.sh)"And for the theme, Powerlevel10k:
Terminal window git clone --depth=1 https://github.com/romkatv/powerlevel10k.git "${ZSH_CUSTOM:-$HOME/.oh-my-zsh/custom}/themes/powerlevel10k"Edit your shell config with:
Terminal window nano ~/.zshrcUpdate the
ZSH_THEMEsection to look like this:Terminal window ZSH_THEME="powerlevel10k/powerlevel10k"Tip (Recommended plugins)
Here are some of the plugins that I recommend starting with:
- git – adds useful command aliases
- zsh-autosuggestions – suggests commands based on history
- zsh-syntax-highlighting – highlights valid/invalid commands in real-time with colours!
The
gitplugin ships with Oh My Zsh, butzsh-autosuggestionsandzsh-syntax-highlightingneed to be cloned in manually first:Terminal window git clone https://github.com/zsh-users/zsh-autosuggestions \${ZSH_CUSTOM:-~/.oh-my-zsh/custom}/plugins/zsh-autosuggestionsgit clone https://github.com/zsh-users/zsh-syntax-highlighting \${ZSH_CUSTOM:-~/.oh-my-zsh/custom}/plugins/zsh-syntax-highlightingThen edit your shell config with:
Terminal window nano ~/.zshrcAnd update the
plugins=()section to look like this:Terminal window plugins=(git zsh-autosuggestions zsh-syntax-highlighting)
Web Browser
-
- I’ve been using Arc for how content-focused and clean its UI is, but its team has basically halted development of new features, and at this point, I do believe it’s worth exploring alternatives.
-
Still, it has some great features worth sticking around for, and those include:
- Spaces: basically profiles or workspaces each with their own tabs, pinned tabs (basically bookmarks), cookies, history and extensions. Quick switch using
Ctrl + [number]. - Vertical Sidebar: controversial and opinionated, but I find this feature really great for tab management and when toggled to be hidden, tabs stay out of the way when browsing content.
- Split View: side-by-side tabs in one window. Useful for quick comparisons!
- Spaces: basically profiles or workspaces each with their own tabs, pinned tabs (basically bookmarks), cookies, history and extensions. Quick switch using
Important (Potential Shortcomings)
Arc auto-archives (deletes) inactive tabs after a set time, up to 30 days, and there’s no setting to disable this. Definitely a bold choice, and one that will need some getting used to.
The workaround: pin any tabs you actually want to keep around.
-
-
Arc-inspired, open-source, and Firefox-based.
-
This is basically what I’d switch to if (or, realistically, when) Arc’s lack of development becomes too much. Besides, many of the Arc features I mentioned above actually have direct equivalents here:
- Workspaces: same idea as Arc’s Spaces.
- Vertical Sidebar: same vertical tab management that I’ve grown used to in Arc.
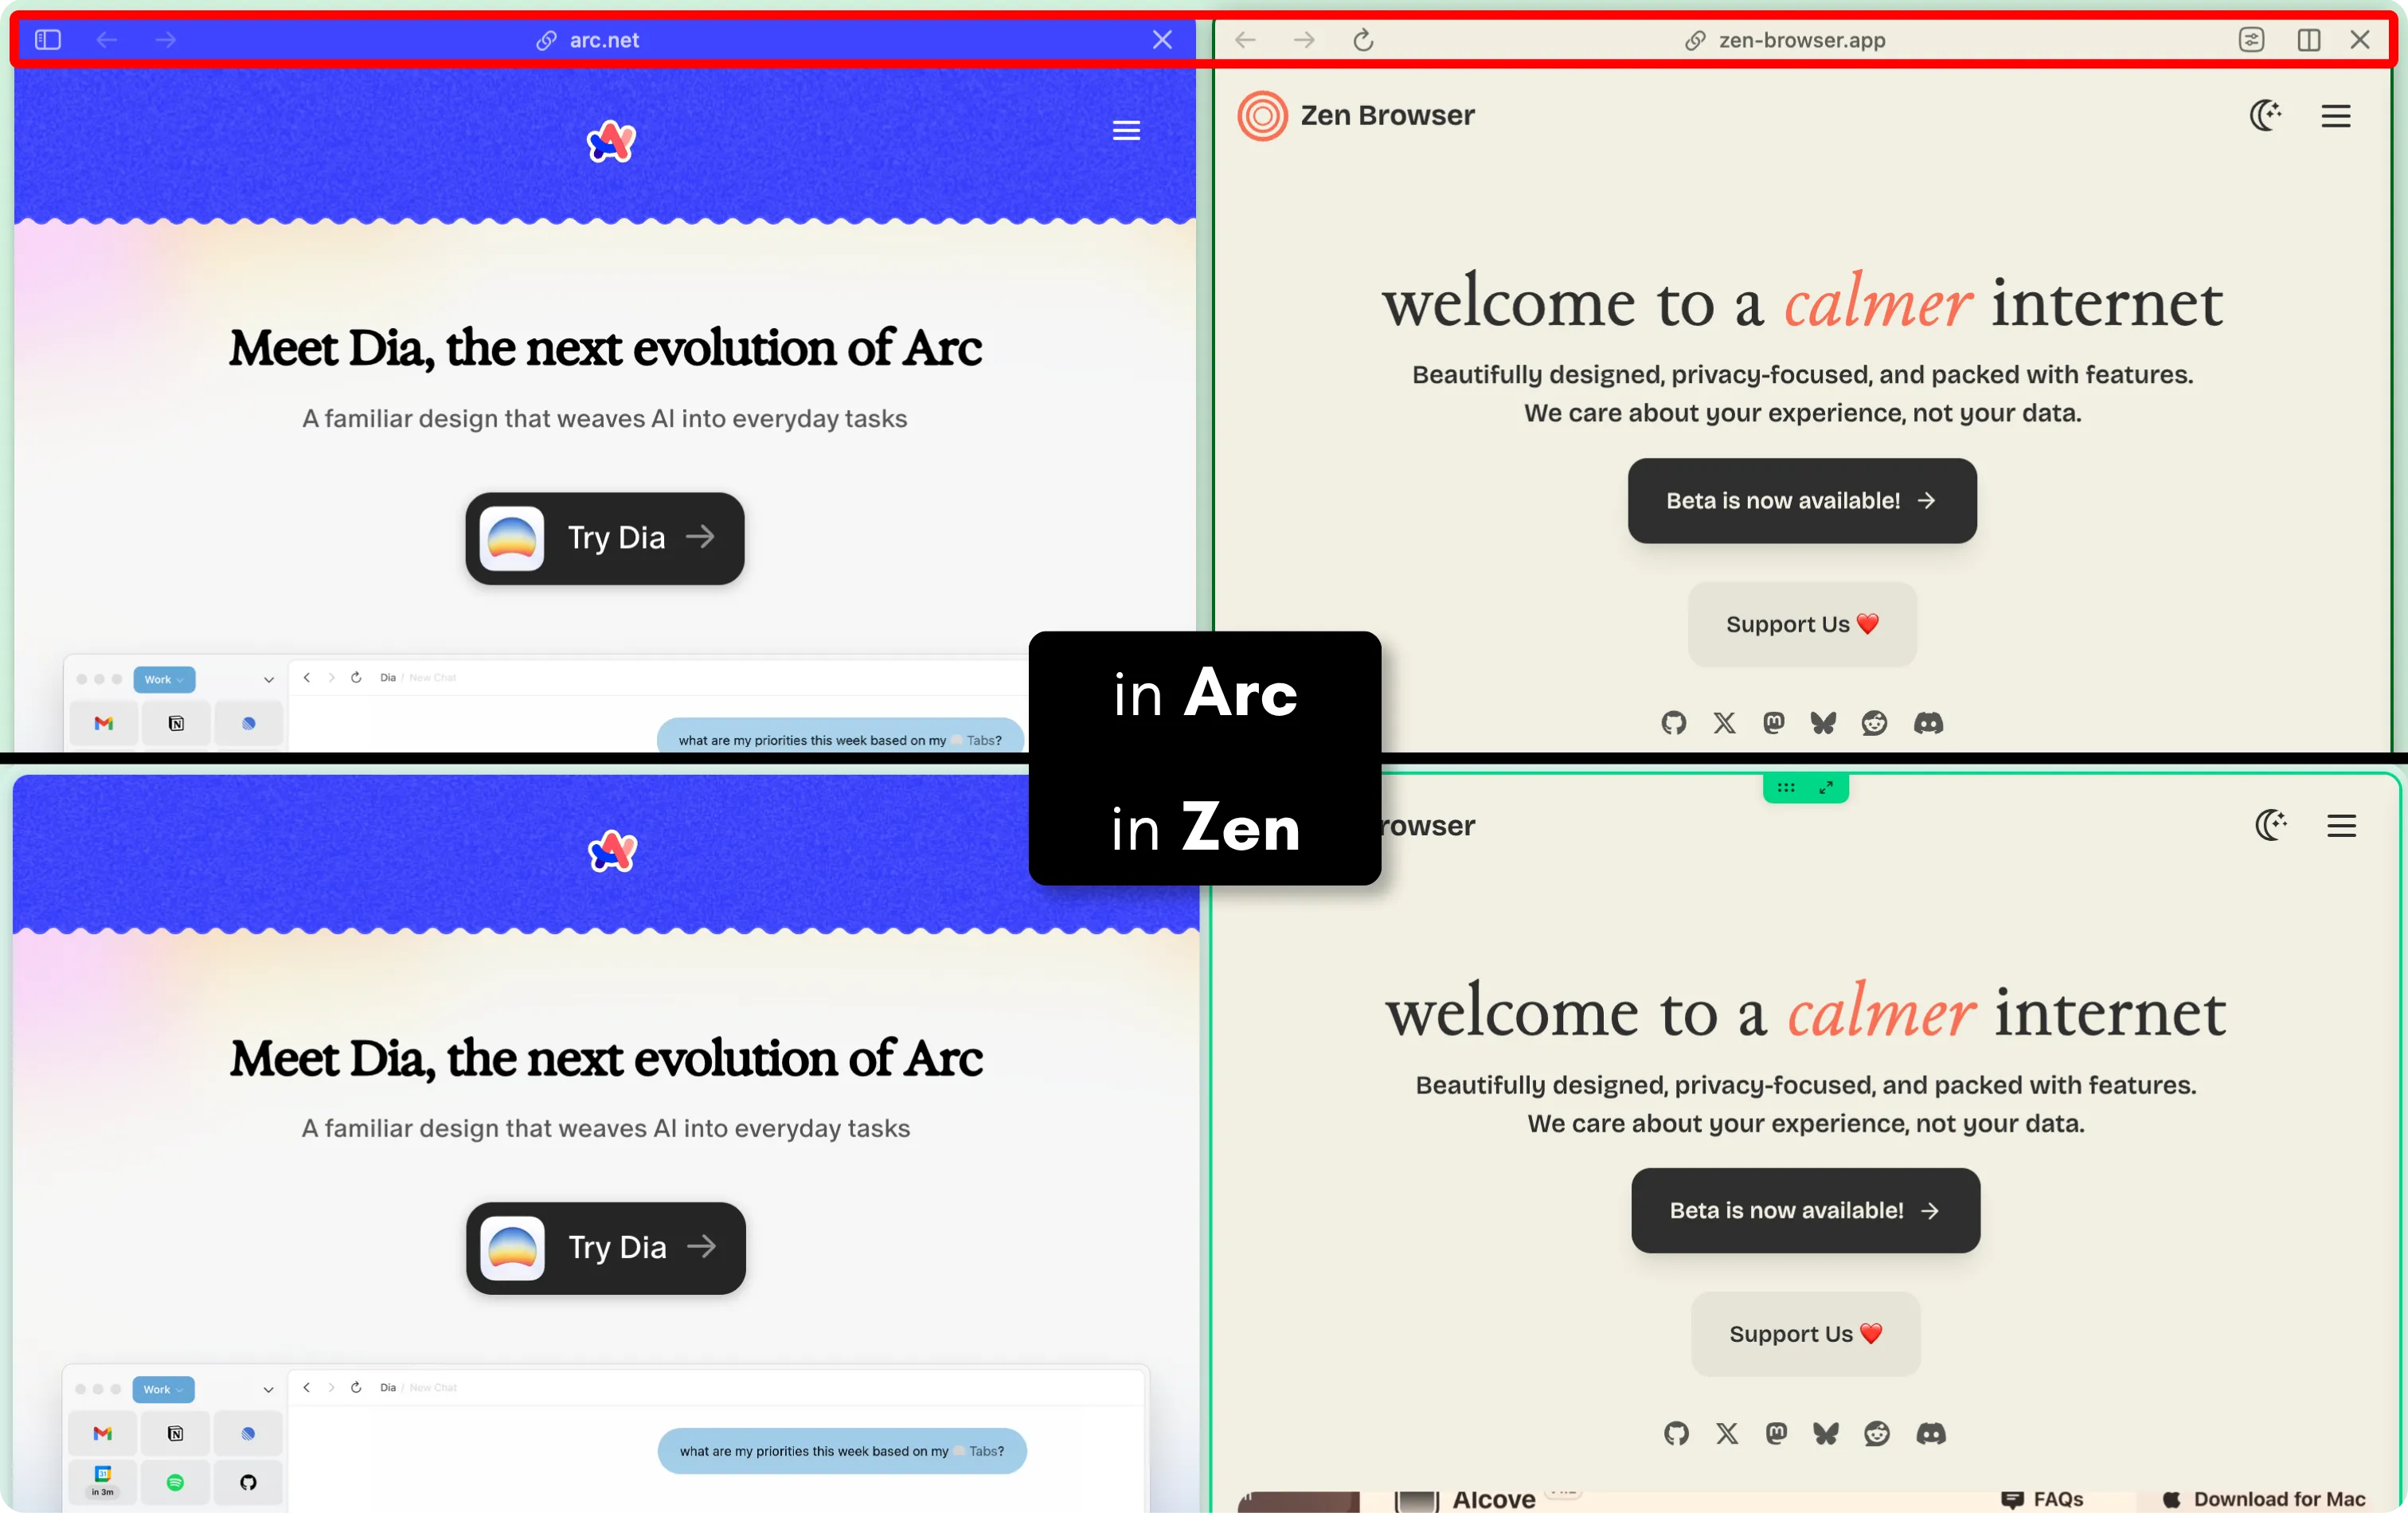
- Split View: also supported, with a similar feel. In fact, Zen provides more vertical real-estate in its implementation, removing the URL bar in split view.
Split View in Arc (top-half) vs. in Zen (bottom-half)
- Honestly, the experience is close enough that the muscle memory carries over. I’ve been testing it on macOS and daily-driving it on Windows, and the rough edges are few and rare enough to not get in the way of daily browsing.
Important (Potential Shortcomings)
Zen doesn’t support DRM-protected content, which means streaming platforms like Netflix and Disney+ won’t work. Could be a dealbreaker if you watch a lot of content in your browser, so worth knowing upfront.
Also, it’s probably worth noting that Zen is still in beta as of writing this, so expect the occasional bug.
-
Productivity & Lifestyle
-
Notion / Obsidian for note taking, based largely on preference
-
Anki for spaced-repetition flashcards
- I use this for retaining technical concepts and anything that I want to remember long-term. The mobile app syncs with the desktop version through AnkiWeb, so I can do quick reviews during my daily commutes.
-
Apple Mail, Reminders, and Calendar (already comes pre-installed on macOS)
- Nothing fancy here, just the default Apple apps.
- I stick with them because of how seamless and simple they are.
Additional Tools / Utilities
-
Raycast, a replacement to the built-in Spotlight feature
-
Boosts productivity and absolutely brilliant for some of my daily use cases like:
- launching applications,
- searching and managing files,
- accessing clipboard history,
- managing windows intuitively,
- and quick conversions!
-
It even has a store for community-built extensions. Honestly, this is one of those tools I can’t imagine switching back from.
-
No, seriously, try it out! :))
Note (Installation steps)
Download Raycast from the site, or via Homebrew:
Terminal window brew install --cask raycast -
-
Blip for quick, convenient, cross-platform file sharing
- AirDrop is locked to the Apple ecosystem and to close-proximity sharing, so I use Blip to send large files across my various devices, including Android and Windows.
macOS Settings
Finder
- Enabling file name extensions
- On the top menu bar, click
Finder>Settings>Advanced> CheckShow all filename extensions.
- On the top menu bar, click
Dock
- Automatically hide
- In
System Settings>Desktop & Dock> EnableAutomatically hide and show the Dock.
- In
Got something I missed?
This is a working list that’ll keep changing as I find better tools or realise I’ve been doing things wrong. If you’ve got a recommendation, spotted a mistake, or just have a different setup that works well for you, do let me know to check it out!